|
The
War Room
Additional
Information
Support
|
Contents
History of Launcher Development Launcher 3.2 Plans
The following information
contains content, which if used incorrectly, could cause serious injury
or even death. One must remember with great power comes the price of heightened
responsibility for that power. Please keep safety in mind at all times
when dealing with these high caliber launchers. I would really feel bad
if someone blew their eye out because of the launcher they learned to build
on my site. Not that there arent any other sites out there with similar
content.
These launchers are really fun if used correctly. Just dont be dumb
and try something stupid, like charging it to max pressure and firing it
point blank range in someones face, with that kind of power, I wouldnt
be surprised if they went blind.
Ok! Now on to the good stuff! History of Launcher Development It was the winter of 1996
when I first encountered the world of super soakers. From the start I researched
every soaker on the market and anything else soaker related. After participating
in several battles I had come to conclude that it was time to undertake
the greatest project I had ever begun: the sniper rifle. After about a
year of experimenting with around 20 different designs and countless failures
I felt I had hit upon a winning concept in the winter of 2000. You can,
and should, read about how this latest design works on the Theory of Operation
page.
Plop.
The orange flumped out of the barrel and landed a few feet away.
This, to say the least, was anticlimactic. Then someone(Jeff?) suggested
we should place something behind the orange to keep air from escaping around
the projectile, such as a carved down potato. So we once again loaded...pressurized....and
fired.
FWWWWOOOOOOOOSSSSH!!
And a few seconds later...
SCHMACK! THWAP!
Pieces of orange and potato flew everywhere after the ground shaking
impacts. At this point we were all excited and we were like, Oh @#$!!,
what the !@%$ did we just do! Soon after we loaded anything we could get
our hands on. Eggs, water, water bottles, dirt, and more oranges come readily
to mind. After about an hour of impressing ourselves my friends had to
leave and I settled down to think about the water balloon dilemma. I couldnt
think of anyway to keep the water balloon from exploding before it left
the barrel. At this point I joined several yahoo! groups(one of which included
Aquatica) and asked for help with this problem. I got several responses
telling me to lubriate the barrel, wrap the balloon in masking tape, etc.
All these ideas would not work for me since taping the water balloon would
cause it to never explode on impact and I could not lubricate the entire
length of the barrel every few shots during a fight. And finally I concluded
that such a large and heavy gun would seriously hinder movement and stealth
in a fight.
The sniper rifle project halted a few months after this, partly because
I ran out of ideas and partly because I ran out of dough to fund further
testing. Creating that first launcher however told me that I was heading
in the right direction, I just had to refine it. Sometime around 2001 I
resumed the sniper rifle experiments, now officially code named Operation
Sniper. With about 50 hard earned bucks I went to Home Depot and got all
the stuff I needed to build a new gun. This new launcher would be considerably
smaller than the last and it had a 2" barrel for water balloons instead
of 3". I was skeptical however that a gun with such a small air chamber
could provide enough power to launch a balloon. After building the new
gun, appropriately named launcher number 2, I once again fired a water
balloon out of it, and once again the water balloon burst in the barrel.
I went back on the internet and looked around. And then miraculously one
day I found this incredible site dated back to around 1985 about these
MIT college students with my same dilemma! On the site they described how
they used 2 cups to hold the balloon while it traveled the length of the
barrel, the cups then fell away as the balloon exited, similar to sabot
rounds, and the balloon soared full speed ahead completely intact. At first
I was skeptical that something so simple as a cup would do the trick, I
tried it anyways and to my great surprise it worked!! Finally it seemed
I was making progress. My next step would be to create a new launcher with
the same dimensions as this one except with some key features making it
battle field worthy. Mainly these improvements included a fast loading
breech barrel assembly,(I experimented a bit with auto loading rapid fire
but abandoned it in the end) and a more compact design so it could be hauled
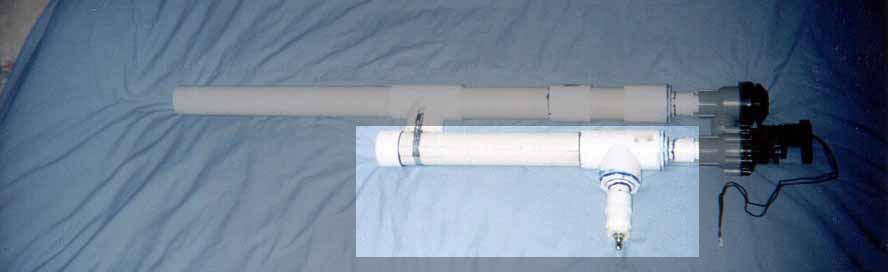
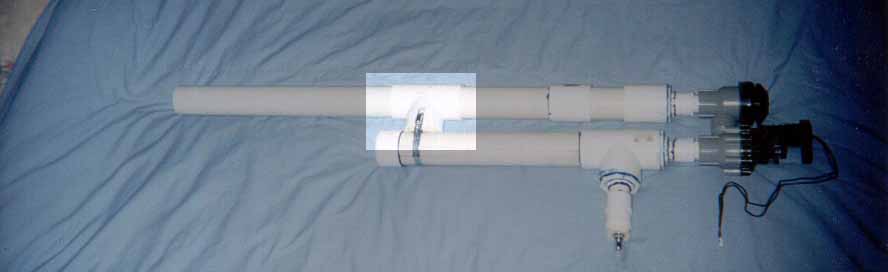
around the field easier. The result is launcher number 3, which brings
us to current times, and it is still being improved as you read these words.
Wonder what launcher number 4 will look like?
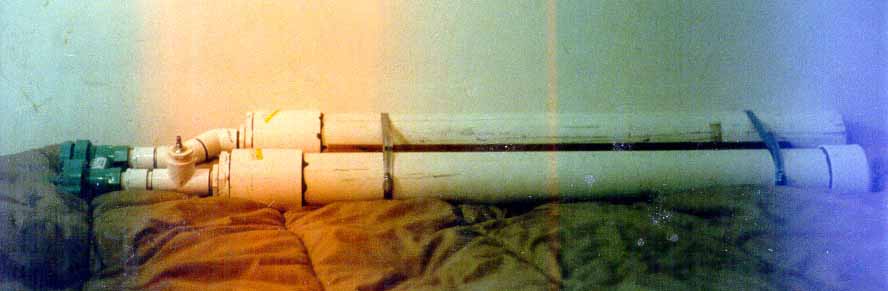
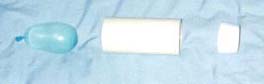
Below is a picture of Launcher Vers 1.0
This the very first penumatic predecessor to today's modern launchers
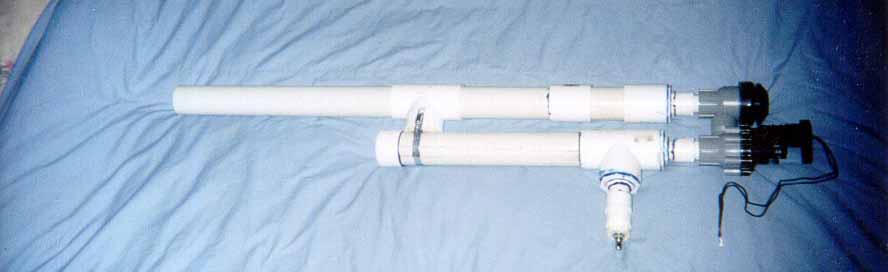
The following plans are my latest plans I am working with. As of yet all pictures of the gun however came from my version 3.0 gun, but they are pretty similar and Ill point out the differences. I am always open for ideas, so build it and let me know what you think or did to make it better! Drill Press - an electric
hand drill would also work I guess but its gonna be harder to work with.
Make sure you have some sort of clamping device to make your drilling more
controlled if you dont use a drill press.
Drill Bits - you will need an assortment of different sized drill bits
and some carving bits. I dont think this is the exact term but Im talking
about the kinds that have rough edges on the side, and a pretty flat end.
They will be used to help carve out holes since larger drill pieces tend
to dig into the plastic and hook in causing the entire section of plastic
youre working with to spin with the drill. Not a good experience.
Circular Wood File - Used to carve out the 2" diameter pvc tee so a
2" section can slide through. This will be explained in detail later. The
file should be pretty rough to you can file down faster.
Sandpaper - To help smooth out the plastic after using the file. I used
80 grit, in other words, really rough.
Mider Saw - The best kind of saw for cutting pvc sections. Makes very
flat cuts without much effort on your part. Power saws dont tend to work
as well and can be potentially dangerous since their wide blades could
easily catch into the pvc plastic and rip up the section your working with
as well as anything near it, for example, your hand. Hand saws are ok,
but its a lot more effort to make cuts flat.
Flat Head Screw Driver - For tightening the hose clamps. A penny would
work too.
Sawdering Gun - Used to weld the wires for the trigger assembly together.
I guess a fire lighter for a stove would also work although I have never
tried it. If you are going to use a stove fire lighter make sure you have
twisted the wires together well before sawdering.
Jigsaw - This will be used for cutting out the handle. Although I have
never tried, you could try using a regular saw and then using a file to
smooth out the cuts. 1
2" diameter 10 foot section of schedule 40 PVC pipe (must be this kind
of pipe!)
1 1" diameter of schedule 40 PVC pipe, they
usually come in 10 foot sections also but your not going to use nearly
that much. On the gun itself I used less than a foot.
1 2" diameter tee, schedule 40 PVC
4 2" diameter coupler, schedule 40 PVC
2 1" diameter male adaptor, schedule 40 PVC
1 1" diameter male plug, schedule 40 PVC
1 1" tee with one threaded end
1 piece of wood(not plywood) 1x1 foot should
be plenty. Thickness should be around 1".
3 sets of 2" x 1" diameter adaptors, youll
have to be a little creative here since every store sells different stuff.
I personally used a 2"x1 1/4", then 1 1/4"x1" diameter bushings to get
from 2"diameter to 1"diameter. And of course these too are schedule 40
PVC.
1 1" Anti-siphon solenoid sprinkler valve. Not
the inline type, but the ones that have openings facing the same direction.
I highly recommend RainBird professional series valves, they are more expensive
than other brands(like $24 U.S currency) but they are well worth the investment.
Since this valve is the heart of your gun, why settle for less than the
best?
1 Can of PVC glue, make sure it says its designed
to withstand pressure.
1 Roll of teflon tape, used to tape your threaded
ends to give an airtight seal.
1 1"x3/4"diameter adaptor, with the 3/4" side
having a male threaded end, schedule 40 PVC
1 Tire Valve, mine came in a set of 5 so I have
plenty extra
3 9 Volt Batteries
3 9 Volt Battery holders, Im talking about
the things that actually snap onto the battery so it can be hooked up to
the rest of the wiring.
1 Momentary switch or button, can be any style
you like, preferably it doesnt light up since this wears down batteries.
1 4" hose clamp
2 3" hose clamp
1 Some sort of device you can use to keep the
barrel still when its ready to fire. On real breech loading sniper rifles
there is a handle with a knob at the end you use to open the barrel and
lock it into place. I just used a strap with the plastic snap on connectors
at the ends. If youre still unsure of what to use, drop me a note.
1 Some sort of rubber sealant, I used glue from
a calking gun, maybe you can find something better. Only use if your breech
assembly is not air-tight enough.
1 Bicycle pump, not the foot pump, but the kind
you use with both hands, the idea is to pump air as fast as you can into
your gun so you can ire quicker. You may also want to try using a battery
operated pump. It seems like a good idea but since I have never gotten
one(yet) I cannot tell you how effective they are.
1 Pressure Gauge, the type with the 3/4" female
threads. Understand this is not a
one afternoon job, I guarantee it will take several days if you work hard.
I only have time once a week for about 1 to 2 hours on Sundays and its
taken me months. Here are a few quick tips before you start construction:
When using PVC glue, be generous and coat both surfaces thoroughly before
connecting them. When connecting the two pieces together use a twisting
motion to make sure the glue is applied to the entire gluing surface. The
fumes from the PVC glue are harmful so dont do it indoors. Its ok if
the glue squishes out when you hook the sections together. Its better
to have more than less. Understand that if just one connection is not properly
glued, the whole gun wont work and youll have to replace all the parts
that are glued to that piece to start over.
If youre not using a mider saw, try and make the cuts as even as possible.
Flatter cuts seal better when gluing.
If you do not have a drill press, make sure you have some sort of clamping
device to make your drills straight and clean.
Do NOT rush anything. When you rush, things get messed up. This project
is gonna take some time, so relax and have fun with it.
1. Take your 10 foot length
of 2" diameter pipe and cut off a 31" section with the mider saw. This
will be the main barrel.
2. Next cut off a 5" section from the remaining pipe. This will be one
of your magazine clips.
3. Using a sanding drill bit and sandpaper carve out one side of the
inside of two of your 2"diameter couplers so that 2" diameter pipe slides
easily through half of it. The places you just sanded down will be where
the magazine clip is fit between later. So make sure it is snug but can
be slid back and forth with relative ease.
3. Take your length of 1" diameter pipe and cut off a 2 1/4" section.
4. Now take out your PVC glue and glue one set of your 2"x1" diameter
adaptor(s) together. Next glue one 2" diameter coupler to your 2"x1"diameter
adaptor(s) assembly. Now glue the piece from step 3 to the 1"diameter side
of your 2"x1" diameter adaptor(s) assembly. Then glue the 1" diameter male
adaptor to the remaining end of your 1"diameter section from step 3. Set
it aside, you have just created the section used to link the barrel to
the valve.
5. Take your 31" pipe section you cut in step 1 and glue on 1 of the
2" diameter couplers to the end. This is NOT the same coupler you used
in step 4. Use a new one.
6. You may find it necessary to apply a bit of rubber(such as the stuff
from a caulking gun, certain kinds of rubber O - rings could also work)
to the areas inside the barrel where the magazine clip makes contact with
the rest of the barrel. This makes the seal more airtight so air is wasted
when propelling the balloon. Do this step after testing it out first, if
it launches fine without it, dont add anything extra.
1. Cut off a 20" section
from your 2" diameter pipe.
2. Take out your PVC glue, glue together 3 sets of your 2"x1" diameter
adaptor(s).
3. Glue a 2" diameter coupler to each side of the 20" section from step
1.
4. Glue one set of adaptor(s) to every open end on the pipe. There should
be 2 total.
5. Take your length of 1" diameter pipe and cut off three 2 1/4" sections.
6. Glue the 2 1/4" sections from step 5 to opposite ends of the air
chamber.
7. On one side glue on the 1" diameter threaded tee. Then add another
2 1/4" section to the non threaded end of the tee, which should be the
opposite side. On the other side glue on the 1"x3/4" diameter adaptor.
8. Take the 1" diameter male plug and the tire valve. Using the drill
press, drill out a hole just large enough for the valves threads to fit
through. Then use a screwdriver or something to tighten the tire valve
into place. Make sure the gaskets are in the right places. The place you
insert air should be facing outward. Duh. Now wrap teflon tape around the
threads and screw it into the threaded end of the 1" diameter tee you glued
on in step 7. The connection does not have to be super tight. Just tight
enough so that it is almost impossible to untwist it with your hand.
9. On the other side of the chamber glue on the 1"x3/4" diameter threaded
adaptor to the end of the 1" diameter section you glued on in step 6. Now
wrap teflon tape around the threads and screw on the tire gauge.
10. (Note: only perform the following steps if you want an electronic
trigger on your gun) Take a piece of wood and cut out the handle of the
launcher. The handle should look something like this:
11. The yellow arrow indicates where you can drill a hole in later for
an electronic trigger. The blue arrows indicate where the two hose clamps
should be when the handle is attached to the air chamber. Attach the handle
as far down the air chamber as possible and firmly secure it on with the
hose clamps.
1. This is probably the
hardest part. Take 1 of the 2" diameter tees and a wood file. Now look
inside the 2" diameter tee. See that plastic sticking up inside used to
keep the pipe from going too far? That all got to be filed down until its
perfectly level with the rest of the insides! And you will most likely
have to file down even further than that. Youll know when you filed enough
when your 2" diameter barrel slides easily through the tee. Try and make
your filing as even as possible. The rounder it is, the more stable your
barrel will be. Make it so that the barrel can easily be push back and
forth in the tee, but not so loose that it slides without you having to
push it. Use the sandpaper when youre finished to smooth it out. The work
is hard but good snipers have patience to get the job done right.
2. The next part is a little tricky a requires some thinking on your
part. You will need to cut out a section from the 2" diameter pipe. This
little piece will stick onto the top opening of the 2" diameter tee youre
working with. The length of this piece depends on the distance between
the barrel and the air chamber. Measure the distance between the barrel
and air chamber, and add ½" to this number. Then cut out the pipe
and glue it to the top section of the tee.
3. Now you will need to carve out an approximately ½" deep curve
on the end of the piece you just glued. Dont carve off a whole bunch at
time. Carve a little, then test to see if your air chamber fits snugly
in the curve. Keep working at it until it is near perfect. Then slide the
whole thing through the barrel and set it up as far to the end of the air
chamber as possible. Now eye the gun and check to see if the barrel is
straight when resting upon the barrel support. A straighter barrel causes
less stress on the barrel and makes it more accurate.
4. Now you will need to drill a hole through the tee large enough for
a hose clamp to slide through. Because drill bits tend to grab hard at
the plastic I took some sanding bits and sanded a hole large enough.
I then took a really small drill bit and carved the hole so it took on
more of a square shape to even the stress distribution on the hose clamp
when it was put on. Now of course you could ignore this step altogether
and just get a bigger(5" or 6"?) hose clamp and just tie it around the
whole thing, but this way looks cooler and in my personal opinion more
sturdy. 1. Wrap teflon tape around
the threads at the end of the male adaptor from the air chamber assembly.
Screw this into the solenoid valve. Make sure the air flow enters at the
end you hooked up to the valve. Once again this connection does not have
to be really tight. Just tight enough for it to be hard to budge with your
hand. You dont want to strip the threads or make it impossible to disassemble
later. Get the handle of the air chamber(the section with the female adaptor
and tire valve) to point down.
2. Wrap teflon tape around the threads at the end of the male adaptor
from the barrel assembly. Screw it into the remaining hole in the valve.
Remember from step 1 about the tightness of the threads.
3. Slide the barrel through the barrel support assembly. Place the barrel
assembly in the proper location on the air chamber and tighten the hose
clamp firmly. Make sure the end of the barrel with the 2" diameter coupler
is facing the valve. Place a magazine clip between the 2" diameter couplers
of the barrel. Make sure the barrel is straightly aligned so that it does
not have to be bent to load a magazine clip. These things are not vital
to make the gun work but are highly recommenced.
Breech Loading Securing Mechanism Add On
Note that everyones breech securing loading mechanism is bound to be
different. Just use what you have or can some up with. The purpose of this
securing mechanism is to keep the front barrel for pushing outward and
causing air leakage. On my gun I used the two 3" hose clamps to clamp
on straps with a plastic connector on each end. (Kind of like the ones
on a bicycle helmet except bigger.
Electric Trigger Add On
On the new v3.2 plans the electric trigger is not an option. One of
the reasons for an upgrade from the 3.1 version was to give it a more comfortable
grip for sniping. Use the below wiring diagram to help you out. Using the
soldering gun to weld wires together. Make sure you dont apply too much
sawder to the connections or youll get a cold sawder, meaning a less
efficient trigger!
These are very basic steps
to operate the gun, read the theory of operation page and the sniper tactics
section for more info.
1. Load a water balloon into each magazine clip as well as some sort
of dispensable buffer. See the theory of operation page for more information.
I used a Styrofoam cup cut down to squeeze into a 2" barrel. Load one of
the clips into the launcher.
2.Pump the launcher up using a bike pump to the desired pressure. Make
certain the pressure goes no higher than 100 psi or there is a very real
chance you could have PVC shrapnel ripping through your skull.
3. Aim and fire by either pressing your electric momentary switch or
by turning the manual on off switch of the solenoid. DO NOT pump up the
gun more than it needs. If needed, let out some air before shooting if
they are too close. If you cannot do this then dont even bother firing.
Soaking stops being fun when people get seriously hurt. |